Have you ever wished that your Mac could talk to you? Do you want to listen to anything that you can read on your screen? Do you want to have some fun with different voices and languages?
In this article, we will show you how to use text to speech on your Mac, how to customize it to your liking, and how to control it with keyboard shortcuts. We will also share some tips and tricks to make the most of this amazing feature.

How to Turn on Text to Speech on Mac?
Enabling text to speech on Mac is a straightforward process that enhances accessibility and provides a dynamic reading experience. Follow these simple steps to activate text to speech on your Mac.
Step 1: Click on the Apple logo in the top-left corner of your screen to open the Apple menu. Select System Preferences from the menu. You can also press Command + Space and type System Preferences to find it quickly.
Step 2: Within System Preferences, locate and click on the Accessibility icon.
Step 3: Navigate to and click on the Speech option in the left sidebar.
Step 4: Once in the Speech section, explore the Text to Speech tab.
Step 5: Check the box next to the Speak selected text when the key is pressed to activate the Text to Speech feature.
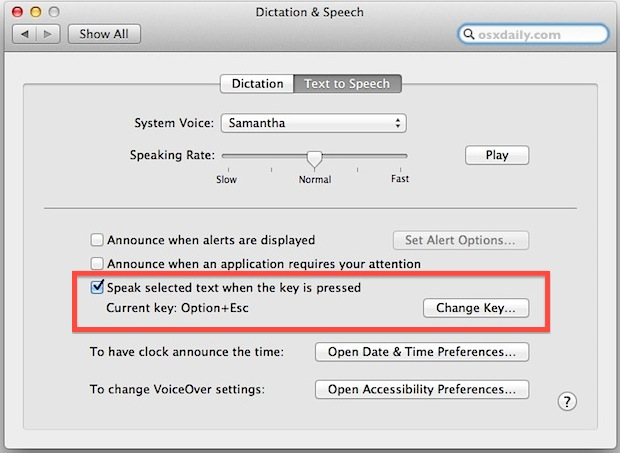
Step 6: Click on the Change Key… button to choose a key combination that you want to use to activate text-to-speech. The default one is Option + Esc, but you can change it to anything you want.
Now that you’ve turned on Text to Speech, your Mac is ready to transform written content into spoken words. You can use it in any app that allows you to select text, such as Safari, Pages, Mail, or Notes.
How to Customize Text to Speech on Mac?
Now that you have turned on the Mac text to speech feature, you can customize it to make it more suitable for you. You can change the voice, the speed, and the language of the speech. Here are the specific steps on how to customize text to speech on Mac.
Step 1: Go back to the Speech section in the Accessibility preferences.
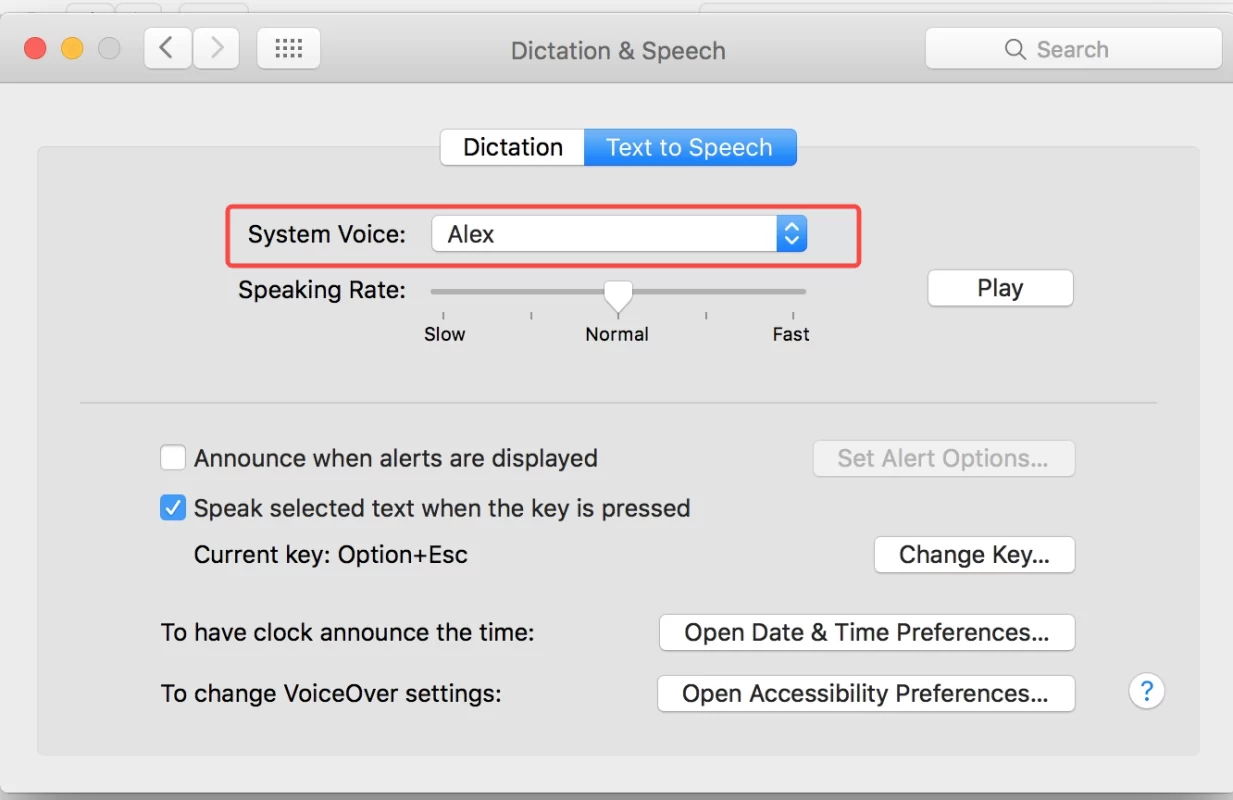
Step 2: Click on the System Voice drop-down menu and select a voice that you like. Mac offers a variety of voices in different languages and accents.
Step 3: Click on Customize… to see more voice options and download additional voices.
Step 4: Drag the slider below the voice menu to adjust the speaking rate. You can make it faster or slower according to your preference.
Step 5: Enhance the voice quality by checking the Use Enhanced Quality option, providing a clearer and more natural-sounding reading experience.
With text to speech activated and customized to your liking, your Mac becomes a versatile tool for consuming written content in a way that suits your needs.
How to Use Text to Speech on Mac?
Harnessing the text to speech functionality on your Mac is a seamless process that can significantly enhance your overall user experience. Follow these straightforward steps to start using text to speech on Mac.
Step 1: Select the text you want to hear with your mouse or keyboard. You can select text from any app, such as Safari, Pages, Mail, etc.
Step 2: Press Option-Esc to start text to speech. Your Mac will read the selected text aloud using the default voice and speed.
Step 3: To pause or resume text to speech, press Option Esc again.
Step 4: To stop text to speech, press Command-Period.
By following these steps, you’ve unlocked the power of Mac text to speech.
Tips and Tricks for Text to Speech on Your Mac
Here are some tips and tricks to help you make the most of the Mac Text to Speech feature and enhance your experience.
- hear a specific word or phrase
You can use the Look Up feature by right-clicking on the word or phrase and selecting Look Up. This will show you the definition, synonyms, and pronunciation of the word or phrase. You can also click on the speaker icon to hear it spoken aloud.
- hear a web page read aloud without any distractions
You can use the Reader View feature in Safari by clicking on the Reader View icon in the address bar. This will remove any ads, images, or other elements that are not part of the main text.
- hear a PDF document read aloud
You can use the Preview app on your Mac by opening the PDF file with Preview selecting the text and using text to speech as usual.
You can also use the Speech feature in Preview by going to the Edit menu and selecting Speech and then Start Speaking. This will read the entire document from the beginning.
You can also use the Speech feature in Preview to save the PDF document as an audio file by going to the File menu and selecting Export as Audio. This will let you choose the voice, quality, and format of the audio file and save it to your desired location.
Bonus Tip: How to Use Online Text to Speech Tool FineVoice?
Do you want to spice up your voice and create amazing audio content for your YouTube channel or streaming platform? You can try FineVoice this versatile AI voice generator. You can use this tool for various purposes, such as making voiceovers and videos, podcasts, or just having fun with your friends.
This tool supports over 154 languages and accents, including English, Chinese, Russian, Spanish, French, German, and more. With it, you can generate natural and realistic voice clips from any text. You can make voiceovers in 1500+ AI voice models.
Using the Text to Speech feature of FineVoice is very easy and simple. You can just follow these steps.
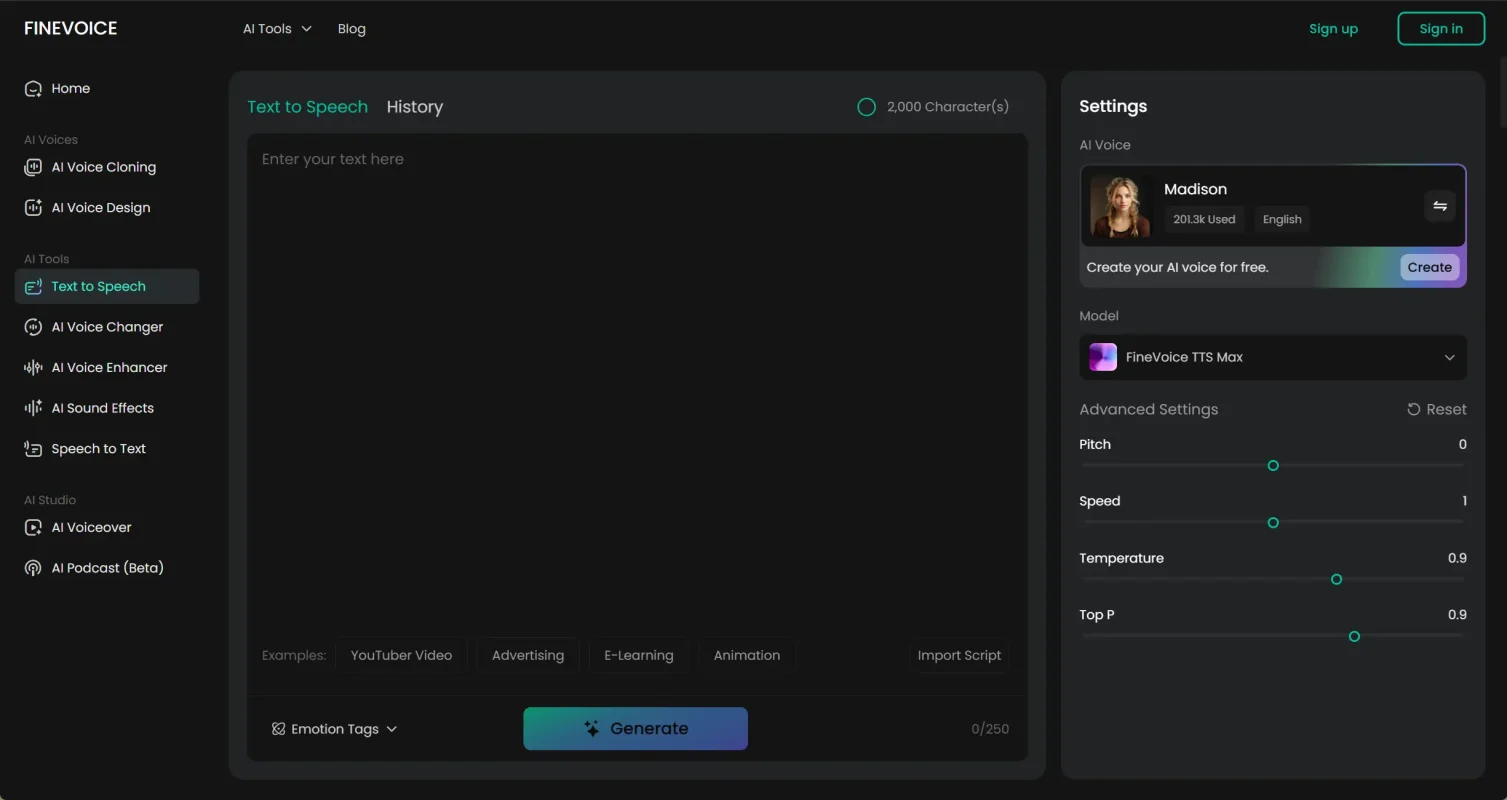
Step 1: Go to FineVoice Text to Speech.
Step 2: Enter or paste the text you want to convert into speech in the text box.
Step 3: Select a voice from the AI Voice.
Step 4: Change the pitch, speed, temperature, and top-p of the voice.
Step 5: Click on the Generate button and wait for a few seconds for the tool to generate the speech.
Conclusion
In concluding our journey through the realm of text-to-speech on Mac, remember that it’s not merely a tool—it’s an ally in your quest for a richer, more accessible reading experience.
Whether you’re fine-tuning settings to match your preferences, proofreading with newfound efficiency, or simply indulging in the joy of multitasking while your Mac narrates, text-to-speech is your gateway to a more vibrant digital world.
So, with your newfound knowledge in hand, let the words come to life, and may your reading adventures on Mac be forever transformed.
FAQs about Mac Text to Speech
Can I use Text to Speech for language learning on my Mac?
Yes, text-to-speech can be a useful tool for language learning. You can listen to correct pronunciation and practice mimicking speech patterns in different languages.
Is Text to Speech helpful for proofreading?
Absolutely. Text-to-speech can be a valuable proofreading tool. Hearing your text read aloud can help you identify errors or awkward phrasing that may be overlooked during silent reading.
Is it possible to improve the voice quality of Text to Speech on my Mac?
Yes, you can enhance the voice quality by checking the Use Enhanced Quality option in the text-to-speech settings.