I want to use my camera on my Chromebook, but unfortunately, it stops working. Why isn’t my camera working on my Chromebook?
How to fix it? The following methods will help you to fix the Chromebook camera not working problem.
#Method 1. Restart Chromebook
Restarting the Chromebook is the easiest way to fix some minor issues. At first, it would be better if shut down the Chromebook and turn it on again. You can also do it twice to make sure to turn on and off Chromebook completely.
Take the following steps to restart your Chromebook:
Step 1. Find Status Tray located in the bottom right corner of the Chromebook’s screen.
Step 2. Click the Power button and choose the Shut Down button to turn off the Chromebook.
Step 3. Wait for a moment. Turn on the Chromebook.
Step 4. Open any camera app to check if the camera works fine.
Related article: Top 4 Webcam Viewers & Testers to Test Webcam on Windows and Mac
# Method 2. Reset Chromebook Hardware
The Chromebook camera not working may be caused by the Chromebook hardware issue. If restarting Chromebook cannot solve this problem, you can choose to reset Chromebook hardware (it’s also called hard reset).
Here’s how:
Step 1. Turn off your Chromebook.
Step 2. Press and hold the Refresh button and Power button simultaneously.
Step 3. Release the Refresh button when Chromebook restarts.
Step 4. To see if the Chromebook camera works now.
# Method 3. Reset Chrome Browser
Chrome browser will also affect the normal operation of the camera. Resetting the Chrome browser may enable the camera again.
Note: Resetting the Chrome browser will not clear your bookmarks, history, and saved passwords.
Step 1. Click the three dots next to the address bar on the Chrome browser.
Step 2. Find Settings and click it.
Step 3. Click on Reset and clean up.
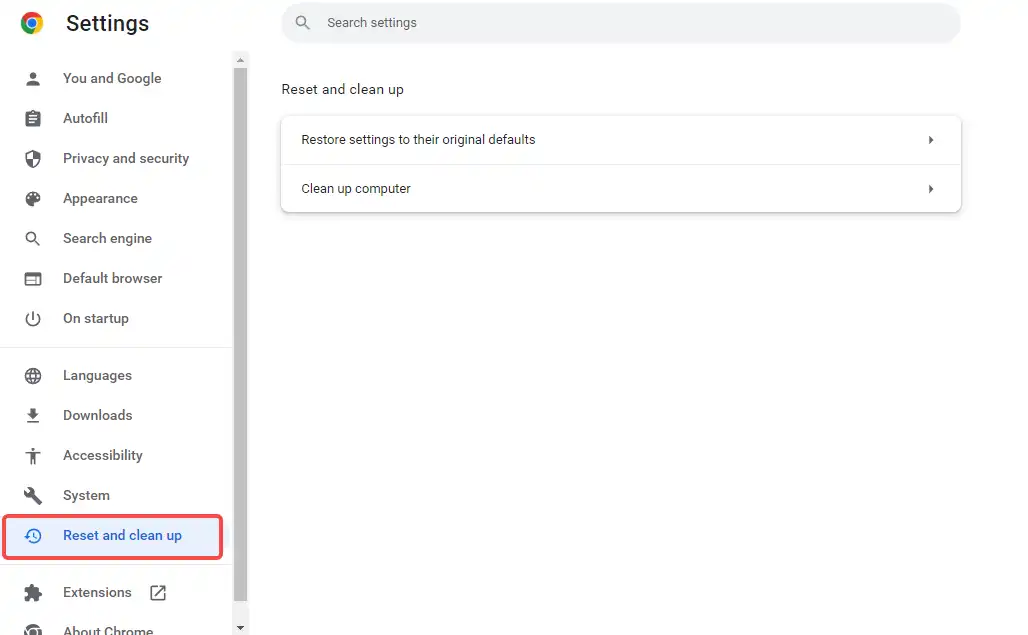
Step 4. Choose Restore settings to their original defaults.
Step 5. Then click Reset settings and see if the camera is working.
# Method 4. Update Chrome Browser
Another solution is to update the Chrome browser. If the Chrome browser has bugs, you can fix the camera problem in the Chromebook by updating the Chrome browser.
Step 1. Go to Chrome browser and click on the three dots.
Step 2. Click Settings.
Step 3. Scroll down the screen and click About Chrome.
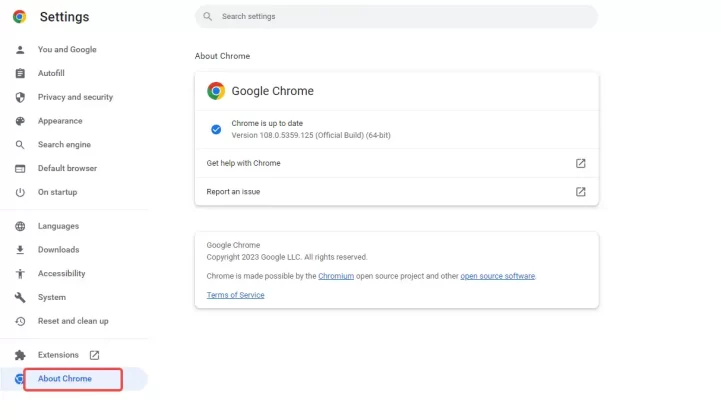
Step 4. It will automatically start looking for an update. Install the newest version, if available.
Step 5. Restart your computer and test your camera.
# Method 5. Update Chromebook’s OS
The outdated Chromebook’s OS could be the reason your camera not working properly. Update Chromebook’s version can fix a lot of bugs including camera problems. It’s also a good method to fix the camera not working.
Step 1. Click Settings on the Chrome browser.
Step 2. Click on About Chrome OS located at the bottom of the screen.
Step 3. Choose the Check for updates. Download the latest version and install it.
Step 4. Click Restart and then see if your camera works properly.
# Method 6. Choose Camera Settings in Chrome
The problem is may related to permission requirements. If you want to use the camera on Chromebook, you must gain rights to access the Chromebook camera.
Step 1. Click the three dots. Open Settings and click Privacy and Security.
Step 2. Click Site Settings.
Step 3. Scroll down to choose Camera under Application Permission.
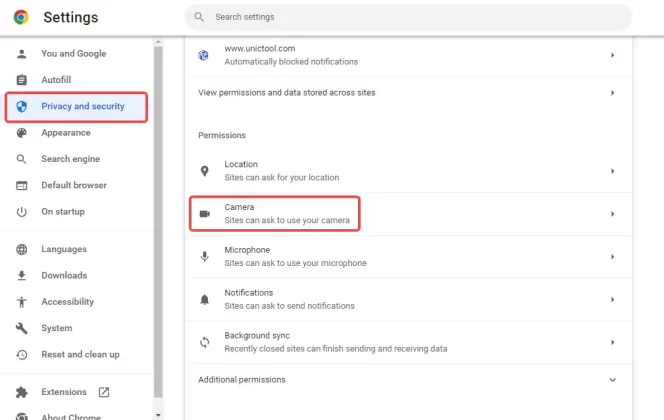
Step 4. Check camera settings. Choose the camera you want to use and select Sites can ask to use your camera.
Step 5. Test your camera and check if the issue has been fixed.
# Method 7. Relaunch and Update the Video Conferencing App
The problem might relate to your video conferencing app. You can try to exit and launch again the app you are using when your camera cannot be detected on your Chromebook. Then check if your app is the latest version. Try to install the latest version, and see if the Chromebook camera is working.
# Method 8. Use Another Camera
If the above methods are not working, you should try to use another camera. Buying a new camera would waste your time and effort. How to quickly get a camera? You can use software like FineCam that turns your phone into a camera.
Conclusion
Here are 8 methods to help you fix your Chromebook camera not working. You can also quickly solve this issue by using the common methods of restarting and resetting your Chromebook and updating the Chromebook.
If your Chromebook’s camera is damaged, you can use FineCam. FineCam can be used as a webcam so there’s no need to go out to buy a new camera.