Can you record a Facetime call? When you are chatting with your close friends on FaceTime, have you ever thought of recording wonderful stories? When you want to record a FaceTime call, but find you don’t know how to do it, or the FaceTime call you recorded has no sound, do you want to know how to record FaceTime with audio? This post will tell you some methods on how to screen record FaceTime with audio. No matter you are using iPhone, iPad, or Mac, we hope this article can solve your problem.
If you think the FaceTime camera pixel is not very good, you can use FineCam to use phone as webcam to get 4K video quality.
How to Record FaceTime with Audio on iOS Before 13.3
If you want to record FaceTime with audio on your iPhone or iPad, you must know that in versions prior to iOS 13.3, you can record FaceTime calls directly using the device’s built-in screen recording tool. Next, we will give you the specific steps to record a FaceTime call with audio using Screen Recorder.
First of all, you need to find the screen recording tool in Control Center. If you don’t find it, you’d better add it to Control Center for your convenience to use this tool at any time.
Step 1. Swipe down from the top of the screen to see if Screen Recorder is already in the Control Center. If you don’t find a circle with a solid circle icon, then you need to add it first.
Step 2. Open your phone’s settings.
Step 3. Slide down to find the control center and tap it.
Step 4. If Access Within Apps button is disabled, tap it to turn it on in green.
Step 5. Click on Customize Controls in the middle of the screen, and in the list of software, find Screen Recorder and click on the green plus sign in front of it to add it to the Control Center.
Step 6. But now the video recorded with Screen Recorder has no sound. You need to turn on the microphone switch. Open Control Center again by swiping down from the top of the screen. Now find Screen Recorder at the bottom right corner, click and hold it. Then a microphone icon and ” Microphone Off” will appear.
Step 7. Click on this microphone icon. It turns red which means that the sound recording function is enabled.
Step 8. Start a FaceTime video call or accept a call invitation. Click Screen Recorder to start recording, then a 3, 2, 1 countdown will appear on your screen, then a red round button will appear in the top left corner of the screen to show the recording status.
When you want to end the recording, tap this button and the recorded video will be saved to Gallery automatically. Or you can open Control Center and end the recording.
How to Record FaceTime with Audio on iOS 13.3 and Later
You should know that for privacy and security reasons, Apple no longer allows Screen Recorder to record FaceTime calls in iOS 13.3 and later, regardless of whether you turn on microphone permissions.
For this group of users, you can use another phone or iPad to record a FaceTime call by taking a video with the permission of everyone else on the call.
How to Record FaceTime with Audio on Mac
There are two very convenient ways to record FaceTime calls on Mac.
First, you can directly record FaceTime calls with audio using Mac’s own screen recording software. It only requires very simple shortcuts to bring up the menu. Here we will show you how to use this tool step by step.
Step 1. On your keyboard, press the shift+command+5 key combination. The screenshot toolbar will appear.

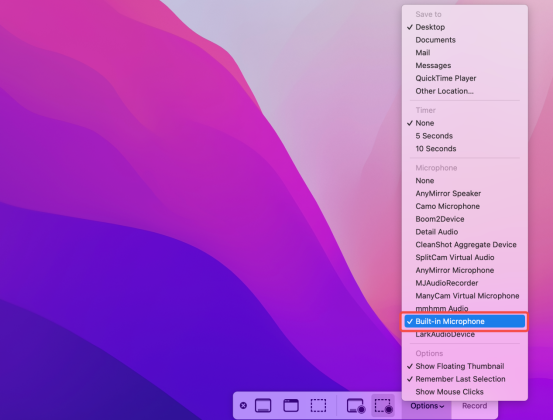
Step 2. Click on one of the two icons next to Options to enable the ability to record your screen. Then click Options, in the extended menu, you can choose the location to save the video.
Step 3. In the microphone option, please select the built-in microphone so that you can record the FaceTime call with sound.

Step 4. When you have done all these settings, click Record to start recording FaceTime calls with sound.
Step 5. When you want to end the recording, you can find the Stop Recording button (a square inside of a circle) in the menu bar at the top of the screen. After you click it, the recorded video will be saved in .MOV format.

Secondly, you can use some good three-way screen recording software, such as OBS, Veed.io, Loom, etc., all can record FaceTime calls.
For privacy and security, recording calls must be approved by other parties.
Conclusion
By now you should know how to record FaceTime with audio on iPhone, iPad, or Mac. You can use the system’s built-in recording tool in earlier iOS versions and on Mac. Of course, you can also seek the help of third-party software. We hope this blog post can be helpful to you.


