When you watch some really funny movies and TV shows, or when you watch a new music video by your favorite singer, do you suddenly regret not recording your initial emotional reaction and analysis of the video to share with others?
If you are interested in making reaction videos, then you have come to the right place. This article will give you a step-by-step guide that will hopefully take you through what you need to prepare and how to make a reaction video.
To get professional audio quality and voice, download FineVoice. This real-time voice changer gives you 30+ voice effects and 200+ sound effects.
What Is a Reaction Video?
A reaction video is a record of a person’s reaction to another video the first time they watch it.
The person making the reaction video will use a picture-in-picture or split screen to show both the original video and his or her reaction to the video to the viewer, including an emotional response and some analysis and opinion.
How to Make a Reaction Video
Explore the fascinating world of creating engaging content by learning how to make AI videos, as we delve into the art of crafting compelling reaction videos that captivate your audience.
Part 1. Preparation before making a reaction video
1. Video preparation.
Whether you want to record your reactions to a variety show, movie, TV show, or music video, or express your opinion about it, first you need to find the video you want to share with your audience.
The important thing is that you have not seen it before. Only the reaction triggered by the first viewing is the most authentic, and viewers don’t like to fake things.
If the video is copyrighted, please try to contact the creator for permission. Otherwise, your work will be judged as infringing and taken down.
Some YouTube reaction video ideas to share with you:
- React to the challenges.
- Reaction to audience comments.
- Reaction to movie and TV show trailers.
- Reaction to video games.
- Reaction to music videos.
- Reaction to old-time videos, ads, and photos
2. Personnel Preparation.
Do you want to record only your reactions, or do you want to record the different reactions of people? If it is the latter, you should send out invitations in advance.
3. Environment Preparation.
You need to plan ahead of time where to record the video. Whether it’s in a cozy home or studio, you’ll need a clean and tidy space to record.
The place you choose should have enough space to accommodate the participants and equipment for this reaction video.
Try to make sure the environment is as quiet as possible when recording, otherwise, you will spend a lot of time later on removing background noise.
Related article: Best 3 Ways to Remove Background Noise from Audio on Windows
4. Equipment Preparation.
- Video recording equipment – recording HD video.
If the built-in camera of your computer is not of good quality, then you need to prepare a webcam, professional camera, or smartphone.
- Camera mount – equipment to hold the camera in place.
Tripod or other stabilization tools.
- Microphone – sound capture device.
The computer’s built-in microphone is usually of poor radio quality.
Even if you use the camera to record sound, consider using a good-quality headset, USB microphone, or professional microphone to back up the audio.
- Lighting equipment – lighting conditions while recording.
Whether additional lighting equipment is needed to ensure adequate lighting for recording.
Part 2. Record a reaction video
Now that you’re ready to work, we’re going to begin recording your reaction video.
This section will be divided into three parts, and you can check the recording instructions depending on the camera equipment you have.
Use a Video Camera
Step 1. Make sure you have plenty of camera memory space. Adjust the lighting and shooting angle and make final preparations for the shoot.
Step 2. Open the video you want to do the reaction on your computer, and put on the headphones.
Step 3. Press the record button on the video camera, and then start playing the video.
Step 4. After the end of watching and reacting, stop recording. Transfer the video to the computer.
Use Computer Built-in Camera
You need a video recorder to record your reactions captured by your computer’s built-in camera. Usually, we can only record the built-in camera and then combine the video with the original video in video editing software.
However, I’d like to introduce you to FineShare FineCam, a webcam software that allows you to record both the original video and your webcam directly in picture-in-picture, saving you a lot of time in video editing.
Let’s see how to record your computer’s built-in camera in FineCam.
Step 1. Download and install FineCam on your computer.
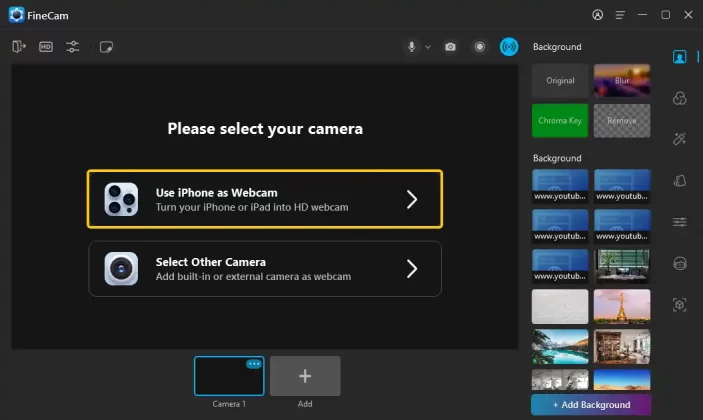
Step 2. Launch FineCam, click + at the bottom of the main interface, click Select Other Camera, and then choose your computer’s built-in camera.

Step 3. Adjust your camera angle to make sure the camera can capture your expressions and hand movements.
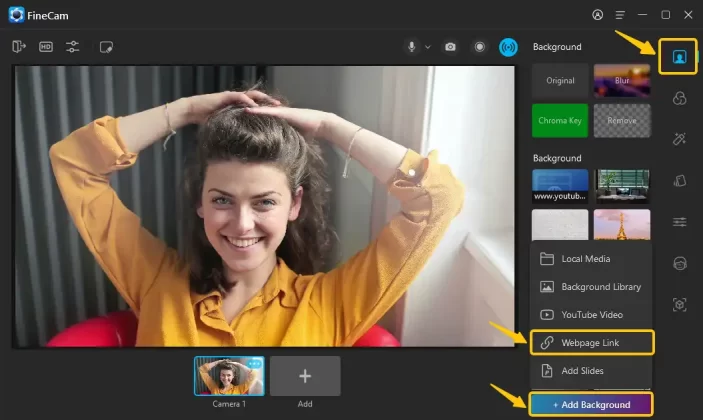
Step 4. Click the first icon Background in the sidebar, then click the + Add Background button at the bottom.
There are three ways to use the video you are reacting to as a webcam background.
- Select Local Media to upload a video that you have already downloaded to your local folder.
- Select YouTube Video to paste a link of a YouTube video. After FineCam loads the video, it will automatically play the video and this video will be displayed on the back layer of what is captured by the camera.
- Select Webpage Link to use any webpage including a YouTube video as your camera background.
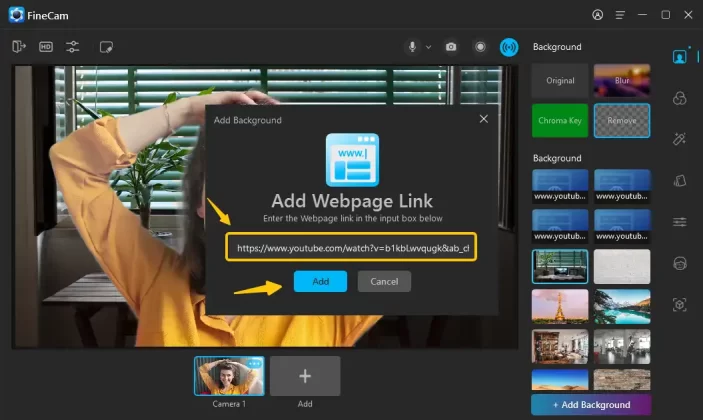
Step 5. We choose the third way as an example to continue the rest of the demonstration.
Copy and paste the URL of the YouTube into the box shown below, and click Add.
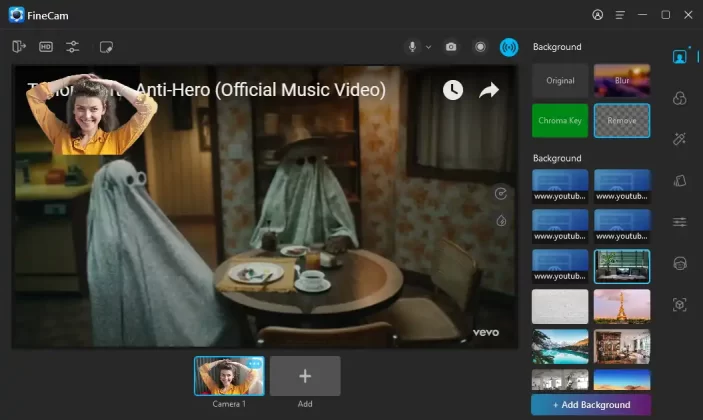
Step 6. You can control the playback of this YouTube video in FineCam.
Adjust the position in your video by dragging your image to one of the four corners so that it doesn’t block the content you want to share with viewers.
Step 7. Wear headphones so that the sound of the original video is not recorded in the audio track of your reaction. Connect the microphone you have prepared to the computer. Find the microphone icon at the top of the video and select the mic.
Find the Record button to the left of the blue button in the upper right corner of your video and click to start recording your reaction video.

You can pause or stop recording the video whenever you want.

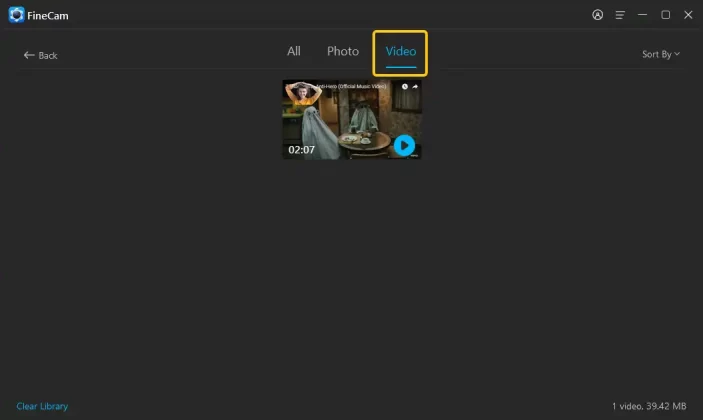
Step 8. After recording all the video materials you need, find them in FineCam My Library by clicking the hamburger icon at the top right corner.
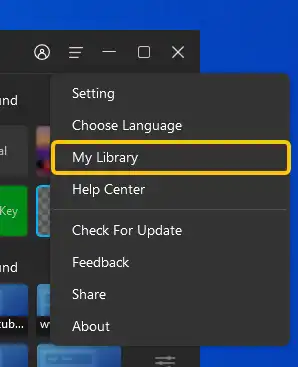
All your videos can be found under the Video tab.
Use iPhone as an HD webcam
In addition to your computer’s built-in camera, you can also choose a USB camera, GoPro, iPad, or iPhone as the camera for recording reaction videos.
Now I will show you what to do if you want to use iPhone as a webcam to record a 4K reaction video.
Step 1. Install FineCam app from App Store. Download FineCam desktop application on your computer. If you want to use Android as a webcam, go to Google Play to download FineCam.
Step 2. Run the FineCam app and connect your iPhone to your computer via the same Wi-Fi network or a USB cable.
Step 3. Launch the FineCam desktop application and click the + under the main interface. Choose Use iPhone as Webcam to turn your iPhone into a 4K webcam.
You can refer to Steps 3-8 of using your computer’s built-in camera to complete the recording of the reaction video.
You can apply cinematic filters and effects in FineCam so you can tweak the video to fit your style while you prepare the original footage.
Edit and publish the reaction video
Now that you have the video materials to make your reaction video, the next step is how to edit the video and publish it to YouTube.
Step 1. Edit the video.
Open a video editing software, such as Adobe Premiere, Filmora, etc. Create a project file by selecting the format and frame rate applicable to YouTube.
Import your video and audio files.
Browse your footage, delete the redundant footage and save the best reactions.
Render and export the reaction video to a local folder.
- Keep as many of your reactions as possible in the final video rather than the original video.
- Play the original video for no more than 30 seconds continuously.
- Try not to play the original audio.
Step 2. Make a cover
Use Adobe Photoshop or Canva to create a cover.
You can export a frame in the video that you feel captures your most realistic reaction expression.
Import it to a picture creation software and add your headline and favorite effects.
Step 3. Video upload
You already know how to do a reaction video. Now it’s the last step of the whole process – video uploading. It’s the same process as you would for uploading other videos to YouTube. Upload the video and cover image in your YouTube Studio, add a blurb, tags, etc., and click Upload.
Bottom Line
Now you know how to make a reaction video on YouTube. Maybe you still need some time to learn the knowledge in recording and editing the video to make a satisfactory video, but you have at least taken the first step.
I hope you can share the joy or other emotions that the original video brought you with your audience. Have fun.